Wednesday 30 November 2022

Star Easel Card + Snowman Tag

A Star Easel Christmas card today, which I saw demonstrated on Elisabeth Hogarth Design YouTube channel HERE.

I used Lisa Horton's 'Layered Stars' dies and a die from the Memory Box 'Twilight Snowflakes' set. I added a clear gem in the middle of the snowflake.  The patterned paper is from a paper pad from The Works. The original design had the points of the folded star at the back showing, but I decided to chop them off.

Here is a side view of the card.
 
I am joining in the following challenges:


I finished off this tag today.
 
I used an MFT 'Cross-Stitch Tag' die and using crochet cotton for the design.  

I am joining in with the following challenges:


Tuesday 29 November 2022

Aussie Christmas

Friends of ours have just flown off to Australia to spend Christmas with their daughter and her family.  This image was just perfect for their Christmas card, which they will open when they arrive.

The image is a pre-coloured digi stamp from Beccy's Place 'Aussie Christmas' set.  The sentiment is also from the same set.  I used a Sizzix 'Stitched Rectangles' die to die cut the image and layered it on a red mat.  The patterned paper was from my snippets drawer and the design and colours were perfect to match the candy canes. I finished off my card with three silver and green stripy sequins to add a little sparkle.

The As You Like It Challenge asks for your favourite non-traditional Christmas Animal (and why).  This year mine is a kangaroo, because it is perfect for friends spending Christmas in Australia.

I am joining in the following challenges:


Monday 28 November 2022

Christmas Goose

A fun Christmas card today.  I'm catching up with some of the letters I missed in Beccy's Month of Holiday Cards Challenge, so for this card I've chosen G for Goose.

The image is a pre-coloured digi stamp from Beccy's Place called 'Grumpy Goose'.   The sentiment is a from the same set.  I die cut the image using a Creative Dies 'Wonky Stitches' rectangular die and layered on a navy blue mat.  The patterned paper is from a paper pad from The Works.  Three tiny yellow pearls finished off my card.

I am joining in the following challenges:


Sunday 27 November 2022

Christmas Shutter Card

I made my first Shutter Card last month, you can see it HERE.  It includes a little video clip of how it opens.

For this shutter card I used Christmas papers from The Works.  They were all snippets from the 12 x 12 paper pad, so I'll be sharing my card over in The Playground.

This is the inside of the card.

As part of the 'Creative Minds ii Kind Kinds' Facebook group I was asked to make a video for our 5th Anniversary celebration event yesterday.   Now, I've never made a video before and it was totally out of my comfort zone, but I thought I'd give it a go and demonstrate how to make this card.  It was strange sat in my dining room on my own, talking to myself!  I recorded it in several short clips and a friend 'stitched' them all together.  You can see my finished video by clicking on the link below.


I am joining in the following challenges:


Saturday 26 November 2022

Joy Fold Card Tutorial

The first fancy fold card I made many years ago, when I'd only ever made single fold cards, was a Joy Fold card.  I've made many cards using this fold over the years for all different sorts of occasions and it's a really easy card to make.  I've made a tutorial for the 'Creative Minds ii Kind Hearts' Facebook group which goes live today, so I thought I'd share my tutorial here on my blog too. (If you're on Facebook, it would be lovely to see you in the group where there is lots of inspiration for cardmaking and papercrafts.  Don't forget to answer the joining questions.)

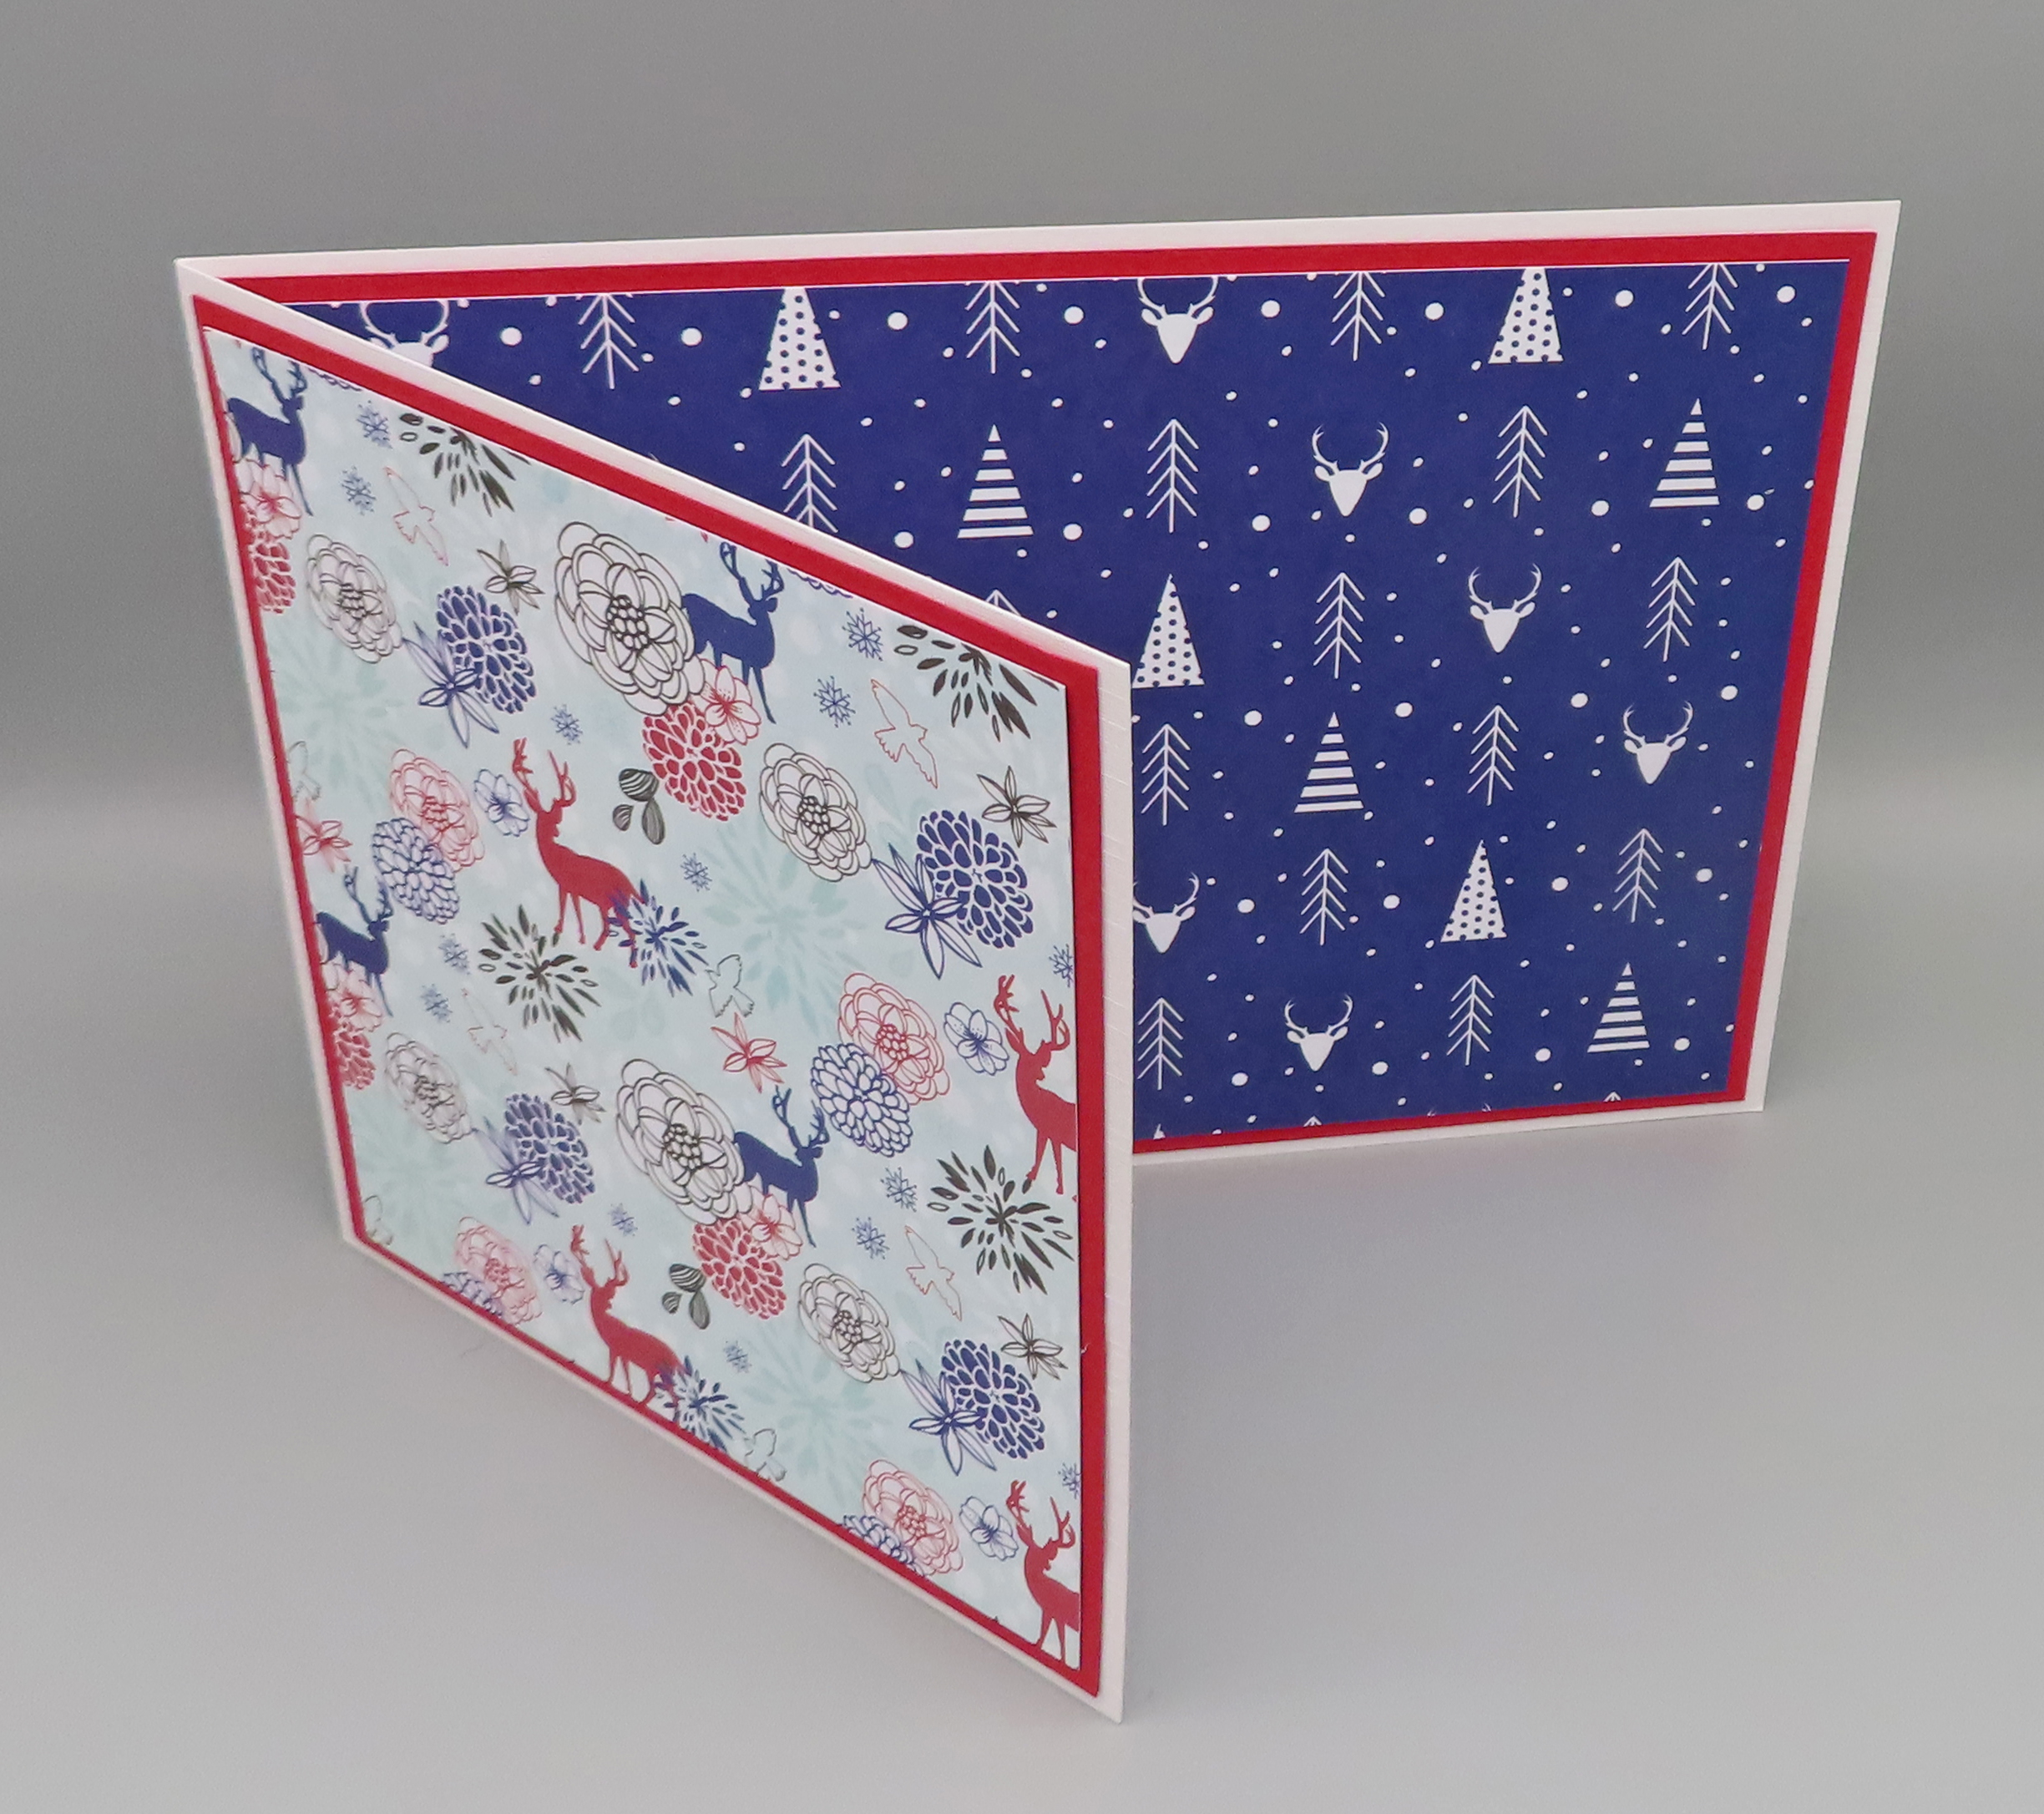
 Here are the instructions for how I make my Joy Fold card.  My finished card measures 7" x 5" when folded.

1. Start with an A4 sheet of card.  Cut at 5" down the length of the card.  The largest piece will be your base card.  Score this piece at 7" and fold along the scoreline.  Save the narrower piece for later.

2. Cut one mat 1/4" smaller than the front panel and one mat 1/4" smaller than the inside back panel. Cut two contrasting pieces of patterned paper 1/4" smaller than the mats.

3. Attach the layered patterned paper to the card as shown in the photo.

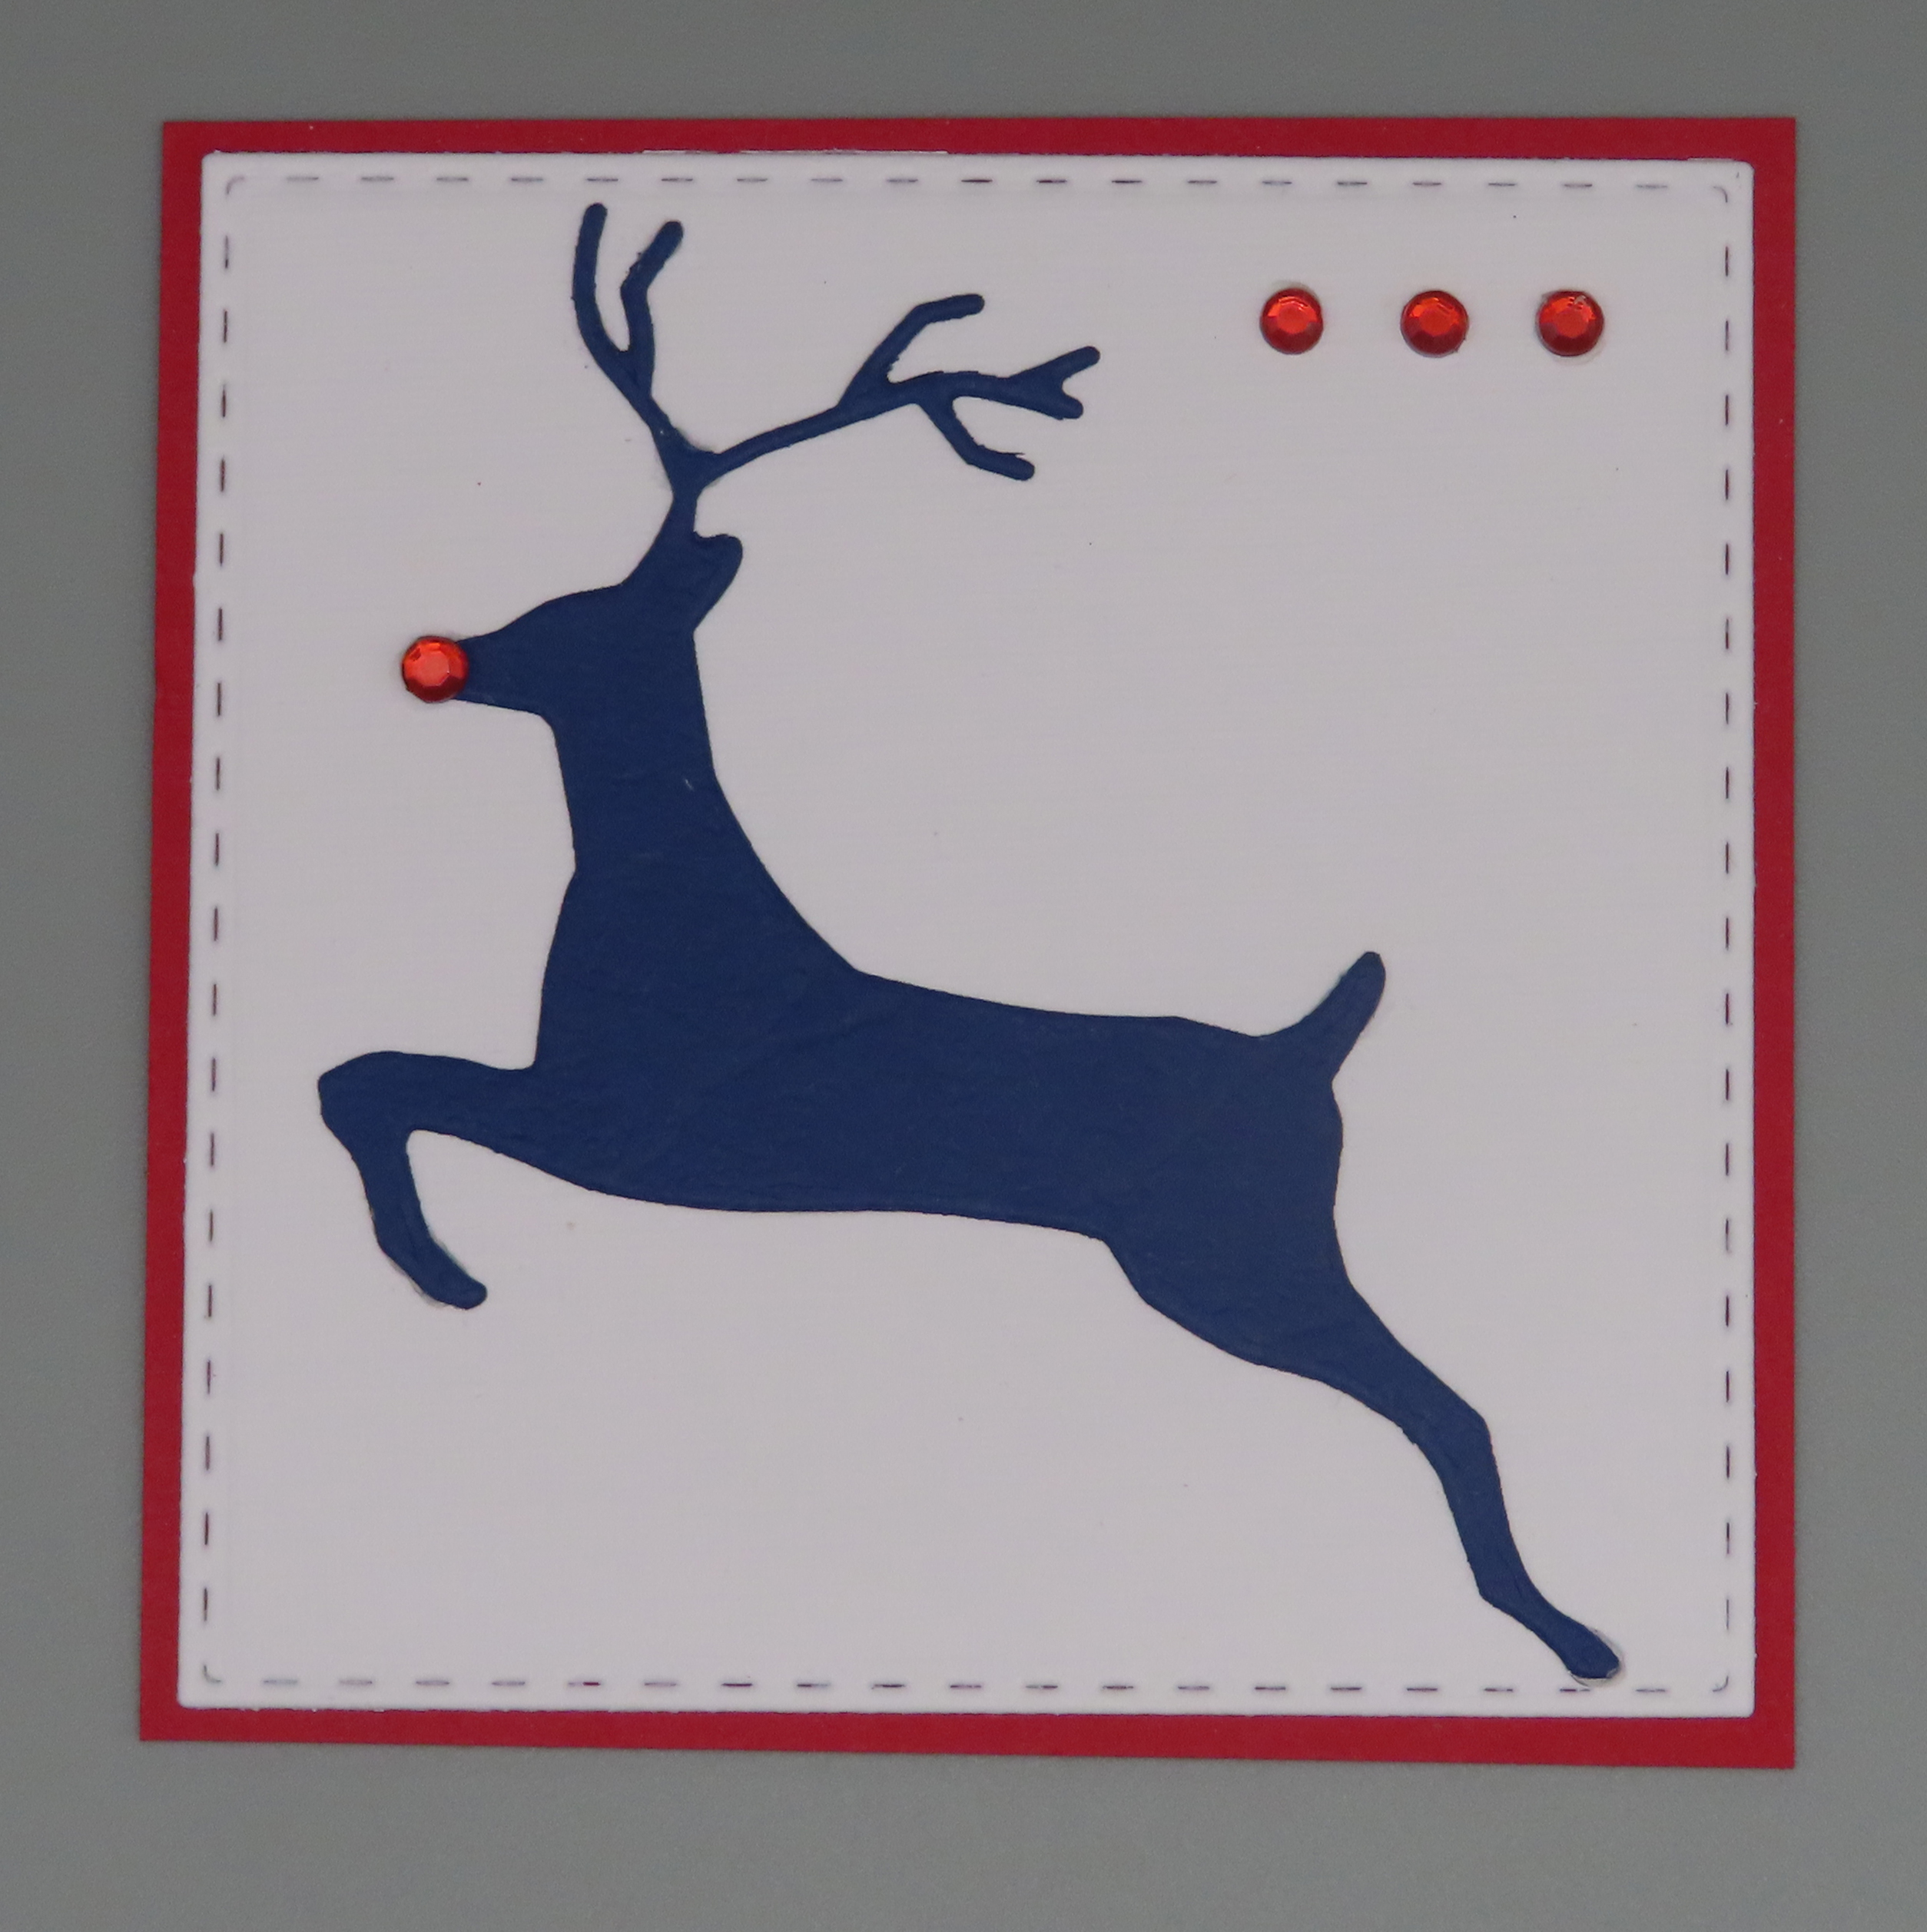
4. Make the topper for the front of your card.  I've used a die cut and gems for mine and measures 3" x 3", but you could use a ready made topper or a stamped image or sentiment.  

5. Trim the width of the long strip of card to 1/4" wider than the height of the topper.  If the long strip of card is not wide enough, you will need to cut a new strip from a second piece of A4 card.  The scoring of the strip of card depends on how wide your topper is.  As my layered topper was 3" wide, I scored at 3 1/4".  Attach the topper to the strip ensuring that the fold is on the right hand side.

6. Keep this card folded and cut off the end so that when folded it measures 5" long.

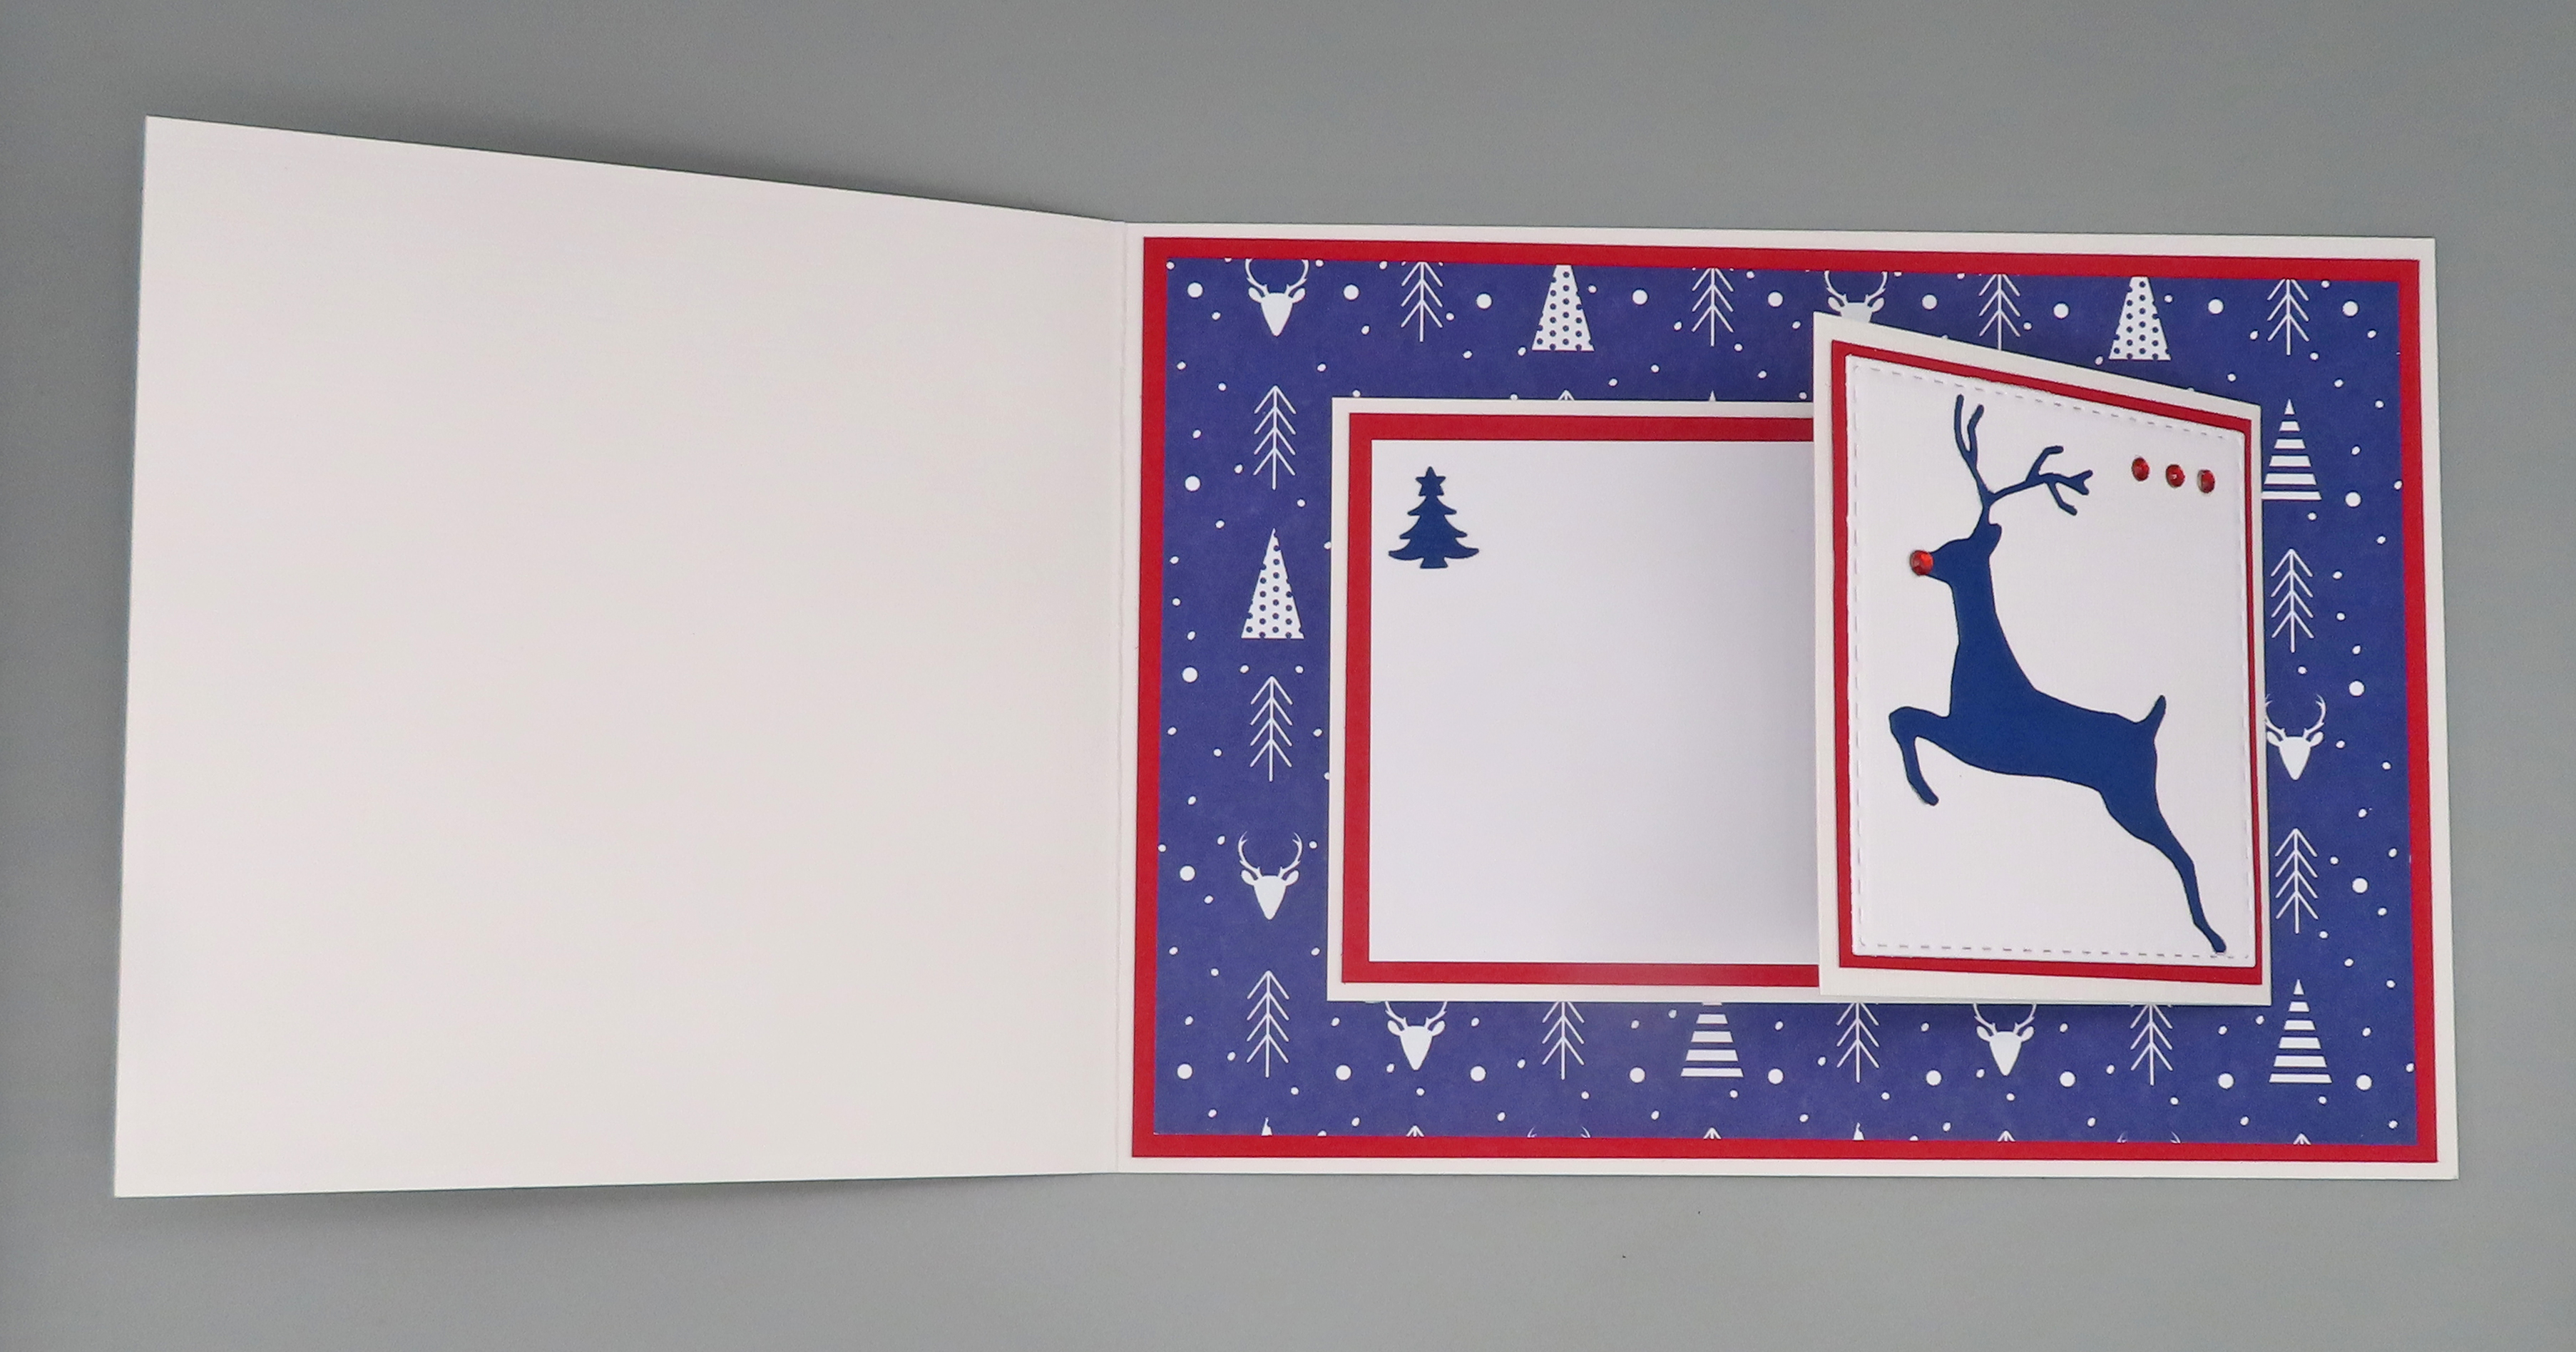
7. Add a layered piece of white card as shown, this will be where the message will be written. I've attached a punched Christmas tree for added interest. 

8. Attach the smaller card inside the larger one.  I've put mine right in the middle, but move it left or right to see which position looks best when the card is closed.

9. Add a sentiment.  I like to be able to keep my card closed, so I use a brad to do this.  Put a pencil mark on the card front, just to left of bottom left-hand corner of the topper.  Make a small hole just through the card front, through the pencil mark.  This can be done with a paper piercer, but I find it easier to use a punch which makes a very small hole.  Push the brad through the card front and secure.  (Depending on the thickness of the brad, the card may need a large letter stamp if posted.)

10. The bottom corner of the topper should just slip in behind the brad.
 
The card can easily be opened to be displayed.

If you haven't tried this fold before, I hope you give it a go.

I am joining in the following challenges:


Friday 25 November 2022

White on White

Two very quick cards today.

I used a Sizzix embossing folder on a piece of white card slightly smaller than the card blank.  I've had the embossing folder for ages, but this is the first time I've used it.  The SU sentiment stamp is stamped with Versafine 'Onyx Black'. The largest snowflake is part of the embossing and I die cut two other snowflakes using dies from the Memory Box 'Twilight Snowflakes' set.  Three tiny clear gems in the centres of the snowflakes finished off my card.

I am joining in the following challenges:
 
I made a second card which was even quicker to make, using another embossing folder.
 I don't know the brand of embossing folder.  It may have been a cover gift with a magazine a few years ago.  I stamped the sentiment in the middle and added a couple of clear gems.  I was going to add a few die cut snowflakes, but I decided that I liked it just the way it is.

Tuesday 22 November 2022

Under the Mistletoe

WARNING... photo overload!

Another batch making session making Christmas cards today using a cute image. 

The cute image and sentiment are from a set called 'Finn and Molly' from Beccy's Place.  As I was making so many cards, I decided to use the pre-coloured version.  I used Lisa Horton's 'Stitched Scalloped Circles' for matting and layering.  The background was embossed a Sue Wilson 'Frosted Stripes' embossing folder.

I am joining in the following challenges:


As promised last week, a few photos from my holiday this month to Norway.  No luck seeing the Northern Lights, but we had a great holiday.

The first six photos were taken at North Cape, the most northerly point of mainland Europe accessible by road.


Sunset in North Cape at 2pm!

Easiest way to get to the top of the mountain.....

..... for a fabulous view.


Warming up by the fire pit in Kirkenes.


There is a little story behind the final few photos.  As some of you know, it was my birthday while we were away.  We crossed the Arctic Circle on my birthday and there was a competition on the ship to guess the exact time we would cross, which was predicted to be between 7am and 8.30am - hour/minutes/seconds.  The prize was the ship's flag which was flying as we crossed, signed by the ship's captain. For no other reason, as it was my birthday I guessed the time I was born, 8.15am, adding 11 seconds as it was the 11th November.... and I won!  As the winner, I was also dragged up to be the first in line for the Arctic Circle baptism by Neptune, ice cubes down the inside of the back of my jumper!  At least we all got a tot of something after to warm us up. 🤣


Oh my gosh, it was COLD!  I had so many layers on and I was wet right through! 


Monday 21 November 2022

Christmas Tree

When I was on holiday earlier this month, I took some cross stitching to do to make some toppers for Christmas cards.  The Santa topper is in my previous post.   I made sixteen cross stitched Christmas trees and I wanted to batch make cards using them all when I got home.  I made a similar card earlier in the year, but simplified the design this time. 

All sixteen cards made today, so I'm nearly on tracking with my Christmas cards for this year.  I used a set of Marianne Designs 'Cross Stitch Tree' dies and cross stitched the tree with crochet cotton.  On this card, the red and green crochet cotton has a metallic thread running through it to make the tree twinkle.  The background is embossed with a Crafter's Companion 'Snowflakes' embossing folder.  I added a tiny clear gem to the star for some added sparkle.

I am joining in the following challenges:


Sunday 20 November 2022

Magical Christmas

Beccy's Month of Holiday Cards Challenge is up to the letter 'S'.  My card has Santa, Stars, Stitching and a Sentiment.

I used an MFT 'Cross-Stitch Tag' die, which I cut into a rectangle.  I cross-stitched a Santa design and layered on a red mat.  The bottom half of the background was embossed with a Creative Espressions 'Shimmering Stars' e/f.  I added a strip of ribbon before attaching the topper with foam tape.  The sentiment is a Papermania stamp and I put a little clear gem in the sentiment to add some sparkle.

I am joining in the following challenges with this card.


A second card to share today.  I made this card a while ago for a card swap and forgot to post on my blog.

I used Sue Wilson 'Adorned Hexagons', 'Double Stitched Hexagons' and 'String Flowers' dies to make my hexagonal easel card.


Saturday 19 November 2022

Q for Quilt

Another Christmas card today.

I used a MFT 'Diagonal Quilt Square', using navy blue card for the frame and papers from a Christmas paper pad from The Works.  The snowflakes are punched.

I am joining in the following challenges: